Guides
How To Get Salesforce to Talk With Craft CMS
Overview
In this guide I'll show you the general overview of how to get Salesforce to call back to your Craft CMS website. This is different than having Craft make an API connection into Salesforce in order to create, read and update data. We can talk about all that in a separate guide. In this guide we set things up so that Craft can receive information from Salesforce whenever Salesforce is good and ready to send it.
Architecture
One of the hardest things to do in software development is get a feel for the big picture. Usually coming to see the big picture means being willing to ask dumb questions and embarrass yourself. I've learned that looking dumb is a super power. With that in mind, these are the big picture architecture bits of a Craft CMS website that is capable of receiving incoming calls from Salesforce.
There are 2 parts to a Salesforce to Craft integration - the Salesforce instance and the Craft CMS website. On the Salesforce side there is a sort of programming language called Apex. It's object oriented and looks a lot like Java. But don't be nervous. You'll recognize a lot of the usual programming patterns and there are plenty of code examples within reach of a Google search.
So you're working inside your Salesforce instance and you are going to be coding in Apex. Here are the actual components that you will need to set up to make a call out to your Craft site.
- You'll need to set up a trigger on an object, in our case the Contact object.
- You'll need to create a class and a method to invoke from your trigger. This is not the only way, but it's the best and most portable from a programmer's point of view.
- You'll need to set up a Named Credential to facilitate Salesforce making a call to your server.
- You'll need to add an entry to Salesforce's Remote Site Settings.
- You'll need to enable logging inside Salesforce to facilitate debugging.
Just to rehearse, Salesforce will be triggered to do something when a Contact is updated. It will make a call to a snippet of code you define as a class. The class will have a method that grabs the Craft url and authentication details from a Named Credential. And the outbound call will be allowed by Salesforce because you will have added the domain to the Remote Sites list.
On the Craft side the architecture looks like this: You'll have a plugin dedicated to receiving calls from Salesforce. This plugin can also do other stuff, but it definitely has the job of receiving and responding to Salesforce requests. In order for this to work, the Craft plugin needs to have at least one Controller class. This establishes the endpoint that Salesforce will specifically call to in order to perform the trigger event. Lastly, you'll want a security layer in between Craft and any outside requests. You need to make sure that the Salesforce request is something you are expecting and that it is authentic. Any other request not meeting your security conditions needs to be rejected so that you keep the Craft site safe. Oh and one last bit, you'll need to make a special exception in the Craft config file to allow incoming Salesforce traffic. We can detail that later.
Now that we have an architecture overview we can move into the details. First, and always first, we talk security.
Security
Security lives on both the outbound server, Salesforce, as well as the inbound server, Craft. On the Salesforce side we want to prevent Salesforce from calling out to just any old url. We tell it which urls it is allowed to reach out to. This protects your Salesforce data. After all, you're going to teach Salesforce to make outbound calls to another server. Those calls are going to include sensitive user data. Salesforce keeps your data secure by making you explicitly authorize outbound calls.
I mentioned above that the Salesforce layer of security for outbound web requests is managed by the Remote Site Settings. This is pretty simple. You just specify the domain or top level url that Salesforce is allowed to call to. You give it a name and a description. Save that and you've satisfied the baseline Salesforce outbound security. We can see exactly how to do this below.
Security on the Craft side is a little more involved. You have already told Salesforce that it is allowed to make calls and send sensitive data out to a server. It's been authorized by you. Now you need to tell Craft what it's allowed to receive from Salesforce, or anyone else.
You have several choices of layers of security when protecting Craft from inbound requests. You can restrict calls to a specific endpoint by IP address range. You can use HTTP basic authentication. You can require some sort of authentication from within your Craft plugin. You can require valid CSRF tokens. You can set up OAuth2. You can build out support for JWT Tokens. There are other methods as well like certificates and such. For the sake of this guide, I have decided that it is sufficient to have 2 of any of the above layers of security. In this guide we'll use HTTP basic authentication as well as Craft level authentication as a specific user. Once this code goes in to production we might tighten up security even further.
This example is for a dev site we're running, dev.someserver.com. Because it's a dev site, we have protected the whole thing behind HTTP basic authentication. That's the method you've likely seen before on an Apache server where you have an htaccess file along with an htpasswd file. The htaccess file demands a username and password combo from the user making the request. It stores the username and password credentials in an htpasswd file. Here's some example code.
.htaccess file
AuthType Basic
AuthName "Salesforce-Guide"
AuthUserFile "/home/someserver/.htpasswds/dev.someserver.com/passwd"
require valid-user
.htpasswd
solspace:{SHA}V5231meiHs//Iz8mengst37pRDc=
Do a Google search for htpasswd generator and you'll get a bunch of simple free tools that help you create the encoded username password combo.
HTTP basic authentication is weak. You really should not rely on it to protect something really sensitive like user data. Since we're going to have two security layers in our dev demo, it's fine.
The second security layer will be native Craft user authentication. In our code we will require Salesforce to make a secure HTTPS call to Craft and in the POST request we'll expect it to provide the username and password of a valid Craft user. Craft has a simple service that we can call to do a programmatic login. The result of the method is a boolean TRUE / FALSE response. That's good enough for our dev example.
So you have 2 layers of security, both of which need to be obeyed by Salesforce. The HTTP basic authentication credentials will be part of the Named Credential in Salesforce and the Craft username and password will be part of the class we define in Salesforce, also detailed below.
SF Apex Trigger
Salesforce has a concept of event triggers. For example, when an Account in Salesforce is updated, an account update event can be triggered. You can piggy back onto these event triggers and do stuff using Apex in Salesforce. Salesforce triggers are pretty much CRUD based: create, update, read, delete.
For our example we want to listen for update events on the Salesforce Contact object. One of the great things about how Salesforce handles triggers is that more than one trigger can initiate your action. We can adjust our example here a little by saying that whenever a Salesforce contact is either updated or created, we want to trigger our event. Here's how you set that up.
While logged into Salesforce in Lightning Mode, go to Setup > Object Manager > Contact > Triggers. You should land on a list of triggers on the Contact object. You can create a new trigger here.
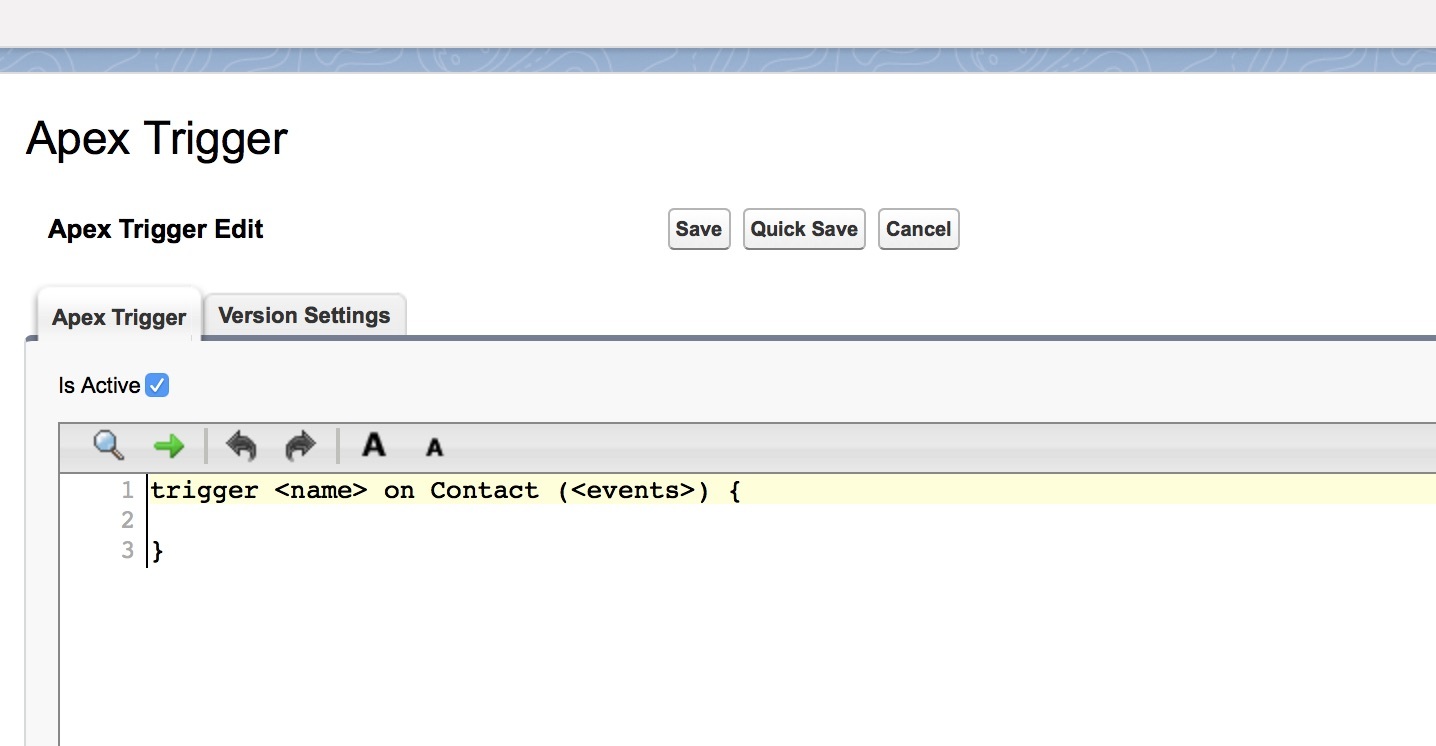
A trigger in Salesforce is basically a block of Apex code to run. You can invoke more than one trigger in your code, like this: before insert, before update. The code snippet below is what you need. The name of the trigger is 'Call_to_Someserver'. You can name a trigger whatever you want, just obey the syntax rules. The trigger fires 'System.debug' so that you can go and look in your logs later for problems. The main work it does is make a call to a class and method that I am about to explain below. 'Someserver' will be the class name and 'makeCallout' will be the method within the class that we call. To that method we pass the value of 'Trigger.New'. And before we pass that over, we tell Salesforce to serialize that object into a JSON string. We want to transmit the data over to Craft in a way that we can unpack and reuse. JSON is awesome for this and it's become the standard for most modern API's.
trigger Call_to_Someserver on Contact (before insert, before update) {
	System.debug(LoggingLevel.Info,'Executinggger');
	Someserver.makeCallout(JSON.serialize(Trigger.New));
}
In our example we're going to have the trigger call to a class that we define separately. This means you'll be creating portable code in the form of an Apex class. This is easier to cut and paste into other Salesforce instances. It's easier to log and debug. It's also easier to invoke directly in the developer console.
When I'm developing intricate code such as with API integrations like this one, I like to decouple as many components as I can so that I can test individual units. This helps you isolate and find problems faster and makes your overall approach to problem solving more stable and reliable. I'll have more specific tips along these lines below.
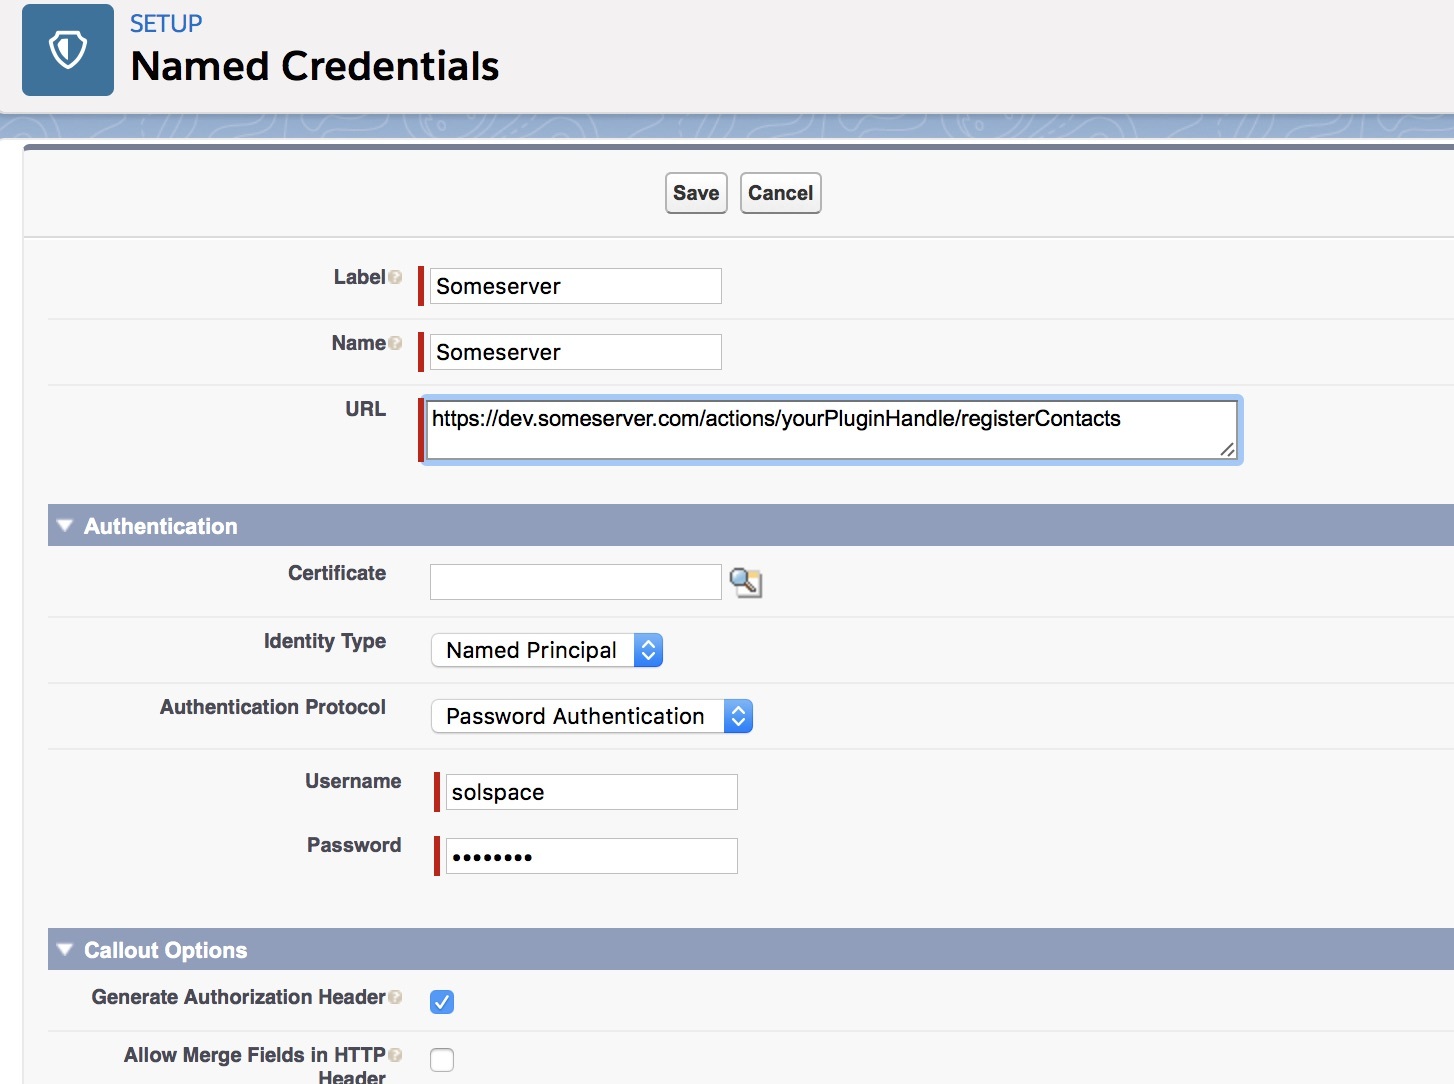
SF Named Credential
We know we're going to call out from Salesforce to another outside server. We know we need to somehow tell Salesforce which url it will call out to, e.g. dev.someserver.com/something/something/something. Salesforce knows that in many cases authentication credentials for reaching an endpoint successfully are directly tied to the endpoint itself. So Salesforce wraps all that up into something it calls a Named Credential.
A Named Credential allows you to specify an endpoint as well as the authentication details of how to pass through that endpoint. In our example we're using HTTP basic authentication. So here's how you would create the Named Credential that you will use in the new class you create below.
While logged into Salesforce in Lightning Mode, go to Setup > Settings > Security > Named Credentials. You can also just use the search field at the top of the Setup menu. Just type 'Named Credential' there. Click 'New Named Credential' and give the credential a label. The name will autofill. Choose Identity Type 'Named Principal'. For Authentication Protocol choose 'Password Authentication'. Enter the username and password for your HTTP basic authentication. This is what you set up with your htaccess and htpasswd file above. Save this and remember the exact name you gave the credential.
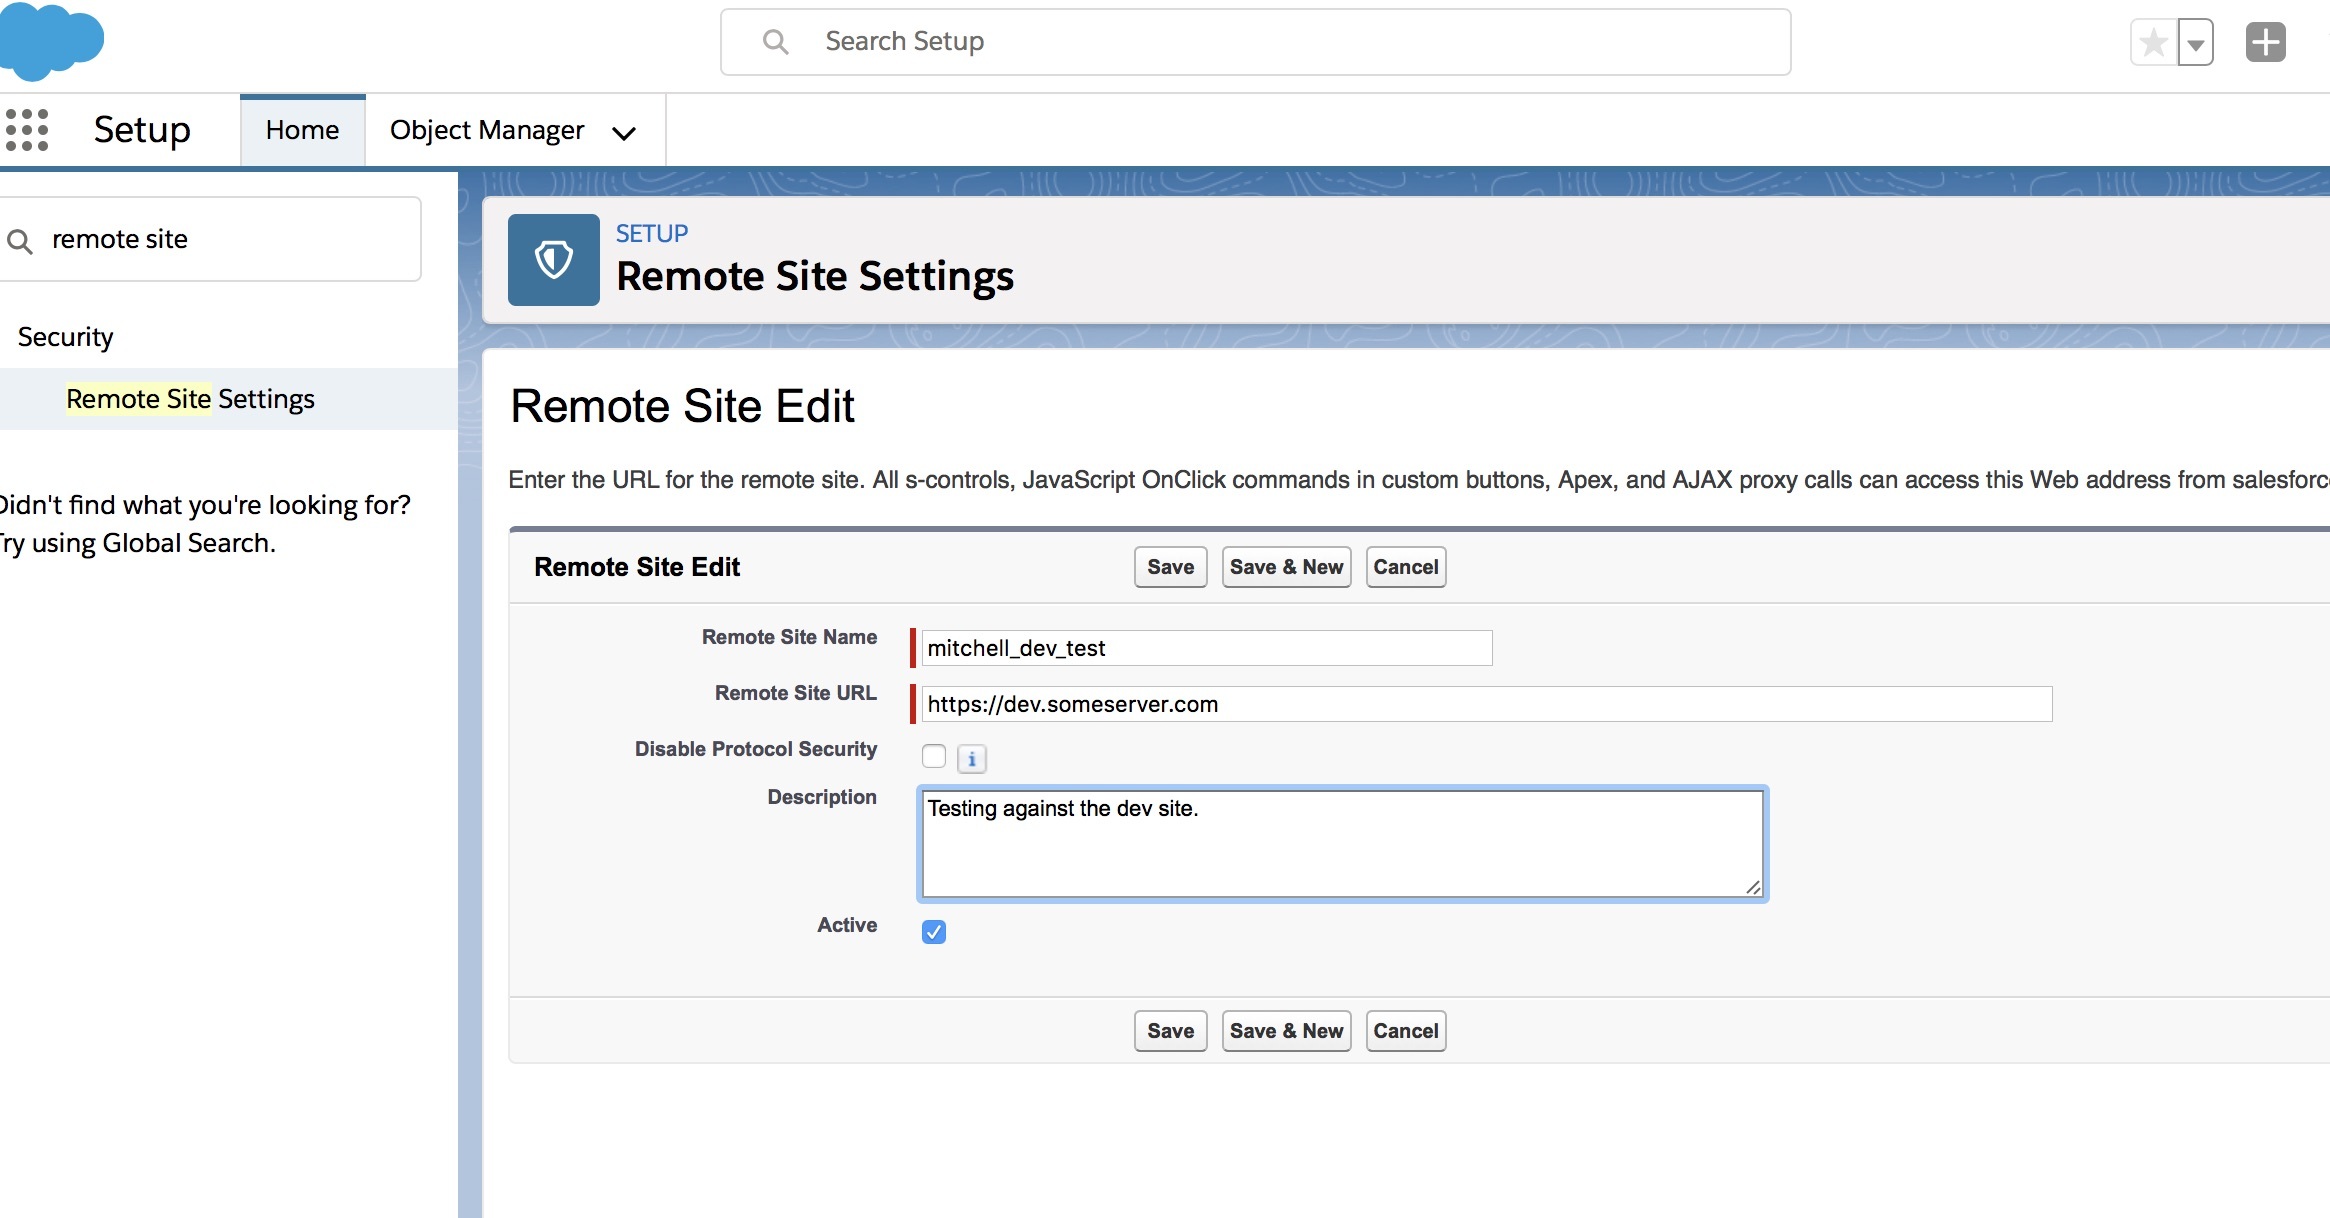
SF Remote Sites
You have to convince Salesforce that it is allowed to make calls to outside servers. It doesn't wake up in the morning just wanting to do that. It prefers to protect your users' data. Set up a record for a new Remote Site so that Salesforce will have your permission to make outside calls.
While logged in to Salesforce in Lightning Mode, go to Setup > Security > Remote Site Settings. Give the record a name and provide the Remote Site URL. This may be a domain or it may be a domain plus some specific top level url that Salesforce is allowed to make calls to. Our example is dev.someserver.com.
SF Class
Here's where the work actually happens, the Apex class. The Apex class will contain the code you're going to write to do stuff when the trigger you created above fires inside Salesforce. More specifically, the class will have methods that the trigger invokes. In our trigger we had this:
Someserver.makeCallout(JSON.serialize(Trigger.New));
Our trigger, the one that fires when stuff happens to a Contact object, can pass the data about the objects it triggers on over to our class. That's the Trigger.New part. We told the trigger to turn the object into JSON since we know we're going to just send it right along to Craft from within our class.
To create your Apex class, while logged in to Salesforce in Lightning Mode, go to Setup > Platform Tools > Custom Code > Apex Classes. Click 'New' and get crackin'. There's just one textarea field to work with here.
Here's our full class code. It's job is to do a little bit of logic, prepare the data for our callout, then make that callout to Craft. I'll explain the bits below:
public class Someserver {
	public static void makeCallout(String contacts) {
		if (! System.isFuture() && ! System.isBatch()) {
			doCallout(contacts);
		}
	}

	@future(callout=true)
	public static void doCallout(String contacts) {
		System.debug(LoggingLevel.Info, contacts);

		String body;
		body = 'username=some_craft_user&password=some_password&contacts=' + contacts;

		HttpRequest request = new HttpRequest();

		// Set the endpoint URL
		request.setEndpoint('callout:Someserver');

		// Set the HTTP verb to POST
		request.setMethod('POST');

		// Set body contents
		request.setbody(body);

		// Send the HTTP request and get the response.
		HttpResponse response = new HTTP().send(request);

		if (response.getStatusCode() == 200) {
			System.debug(LoggingLevel.Info,'Successfull');
			System.debug(LoggingLevel.Info,response.getBody());
		}
	}
}
Define your class.
public class Someserver {}
Declare the method that you invoke from your trigger above. Note that it is a static method. This allows a trigger to call it completely out of the blue. Tell the method what kind of data it should expect to receive from the trigger. The trigger is sending a JSON string across, hence 'String'.
public static void makeCallout(String contacts) {}
Inside the declaration of 'makeCallout' we have a touch of logic to avoid errors inside Salesforce. The code that makes the actual call to our Craft site is going to execute asynchronously from the event that triggers it. In fact, if the call fails, Salesforce will try it again in the future. This is great in case our Craft site goes offline for a few minutes and misses the call from Salesforce. In Salesforce this is considered a future callout. Like this:
@future(callout=true)
Salesforce does not allow us to use future callouts from within other future callouts or from within batch methods. So we have a sub routine that gets fired when we can detect that things are normal inside Salesforce. Like this:
if (! System.isFuture() && ! System.isBatch()) {
	doCallout(contacts);
}
The 'doCallout' method is the actual method that makes our call to Craft. It receives the JSON string of contacts from the 'makeCallout' method above which in turn received the contacts from the trigger we set up. Note that Salesforce can update more than one contact at a time, so it sends the list of contacts it updated / created in Trigger.New not just one contact.
System.debug(LoggingLevel.Info, contacts);
We log the JSON string of contacts. This helps us debug later just in case by the time the data gets to Craft, we don't get what our Craft code is expecting.
String body;
body = 'username=some_craft_user&password=some_password&contacts=' + contacts;
We're going to send a POST request to Craft. That POST is going to contain the JSON string of contacts. But the POST will also contain the username and password credentials of a specific Craft user. Craft will take those credentials and make sure that the user is authorized to do the action we care about in Craft. Imagine you build all this up. Someone locks you out of Salesforce. You decide you don't want Salesforce to be allowed to make these calls anymore. You just change the permissions of the designated user in Craft and they're locked out. The calls will fail. Nice!
Remember we're just in dev mode on this. I know you don't like sending usernames and passwords in the clear. There are a number of ways to tighten up security here, but for the purposes of this guide, we want to see the whole system working. We can tune it later.
HttpRequest request = new HttpRequest();
We'll invoke Salesforce's Apex HttpRequest class and assign it to an object called 'request'. We'll need this to make outbound calls in a minute.
// Set the endpoint URL
request.setEndpoint('callout:Someserver');
Remember the Named Credential above? We attach that credential to the 'request' object. This will now give the 'request' object what it needs to make the outbound call to Craft, namely the url endpoint, username and password.
// Set the HTTP verb to POST
request.setMethod('POST');
We tell the 'request' object that we want it to get ready to send a POST request.
// Set body contents
request.setbody(body);
We give the 'request' object the body of the POST request we want it to make. We defined that above.
// Send the HTTP request and get the response.
HttpResponse response = new HTTP().send(request);
We invoke the HTTP Apex class and call the 'send' method on that class, passing our 'request' object along to it. The method returns a response that we can evaluate next.
if (response.getStatusCode() == 200) {
	System.debug(LoggingLevel.Info,'Successfull');
	System.debug(LoggingLevel.Info,response.getBody());
}
Here we can catch a number of HTTP status codes. 200 is success. When we see that, we log the result we received from Craft. This will help us with debugging, of which I guarantee there will be much!
You've defined your Apex class and named it and its methods so that your trigger can call it. Make sure you save it properly in Salesforce.
SF Logging
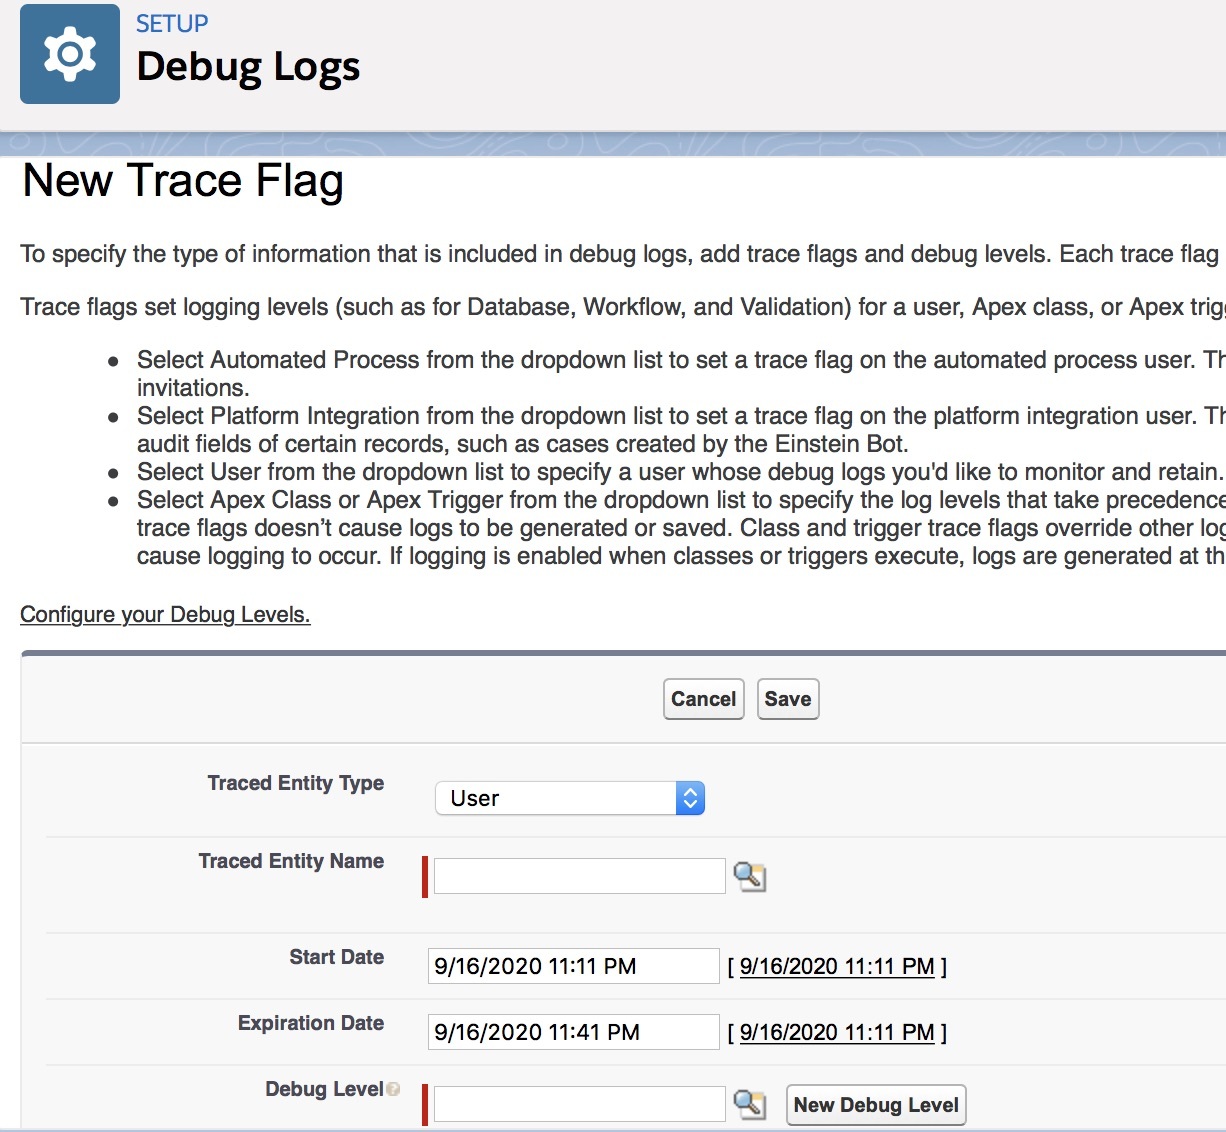
I mentioned a bunch of times above that for debugging we need logging. Remember, we're making asynchronous calls to another server from inside Salesforce. They're invisible to us. The only way to know what they did or how they failed is through logging. Salesforce has a monitoring system that allows you to capture logs of different kinds of activity in Salesforce.
Salesforce has safeguards in place to not overload their own servers with your crazy logging. You have to explicitly ask to log stuff and you can only do so for intervals of 24 hours at a stretch. Here's how to set it up.
While logged in to Salesforce in Lightning Mode, go to Setup > Platform Tools > Environments > Logs > Debug Logs. You'll see a table titled 'User Trace Flags'. Click 'New'. In the 'Trace Entity Name' field use the search icon to find your own user account. You'll be the one testing and triggering stuff. Choose a date range for your logging to be active. You can change these dates later to reactivate a logging profile. In the 'Debug Level' field use 'ALL'. You can fine tune this later if you care. Save this profile.
In the second table on that Debug Log page you'll find logged items. Trigger your event and come back here to make sure it was logged. To find your events in the log more easily, look for your user in the User column as well as 'Api' in the Request Type column and 'FutureHandler' in the Operation column.

SF Testing
Now that you have logging set up, test some of your units. Make sure that everything is firing when you expect and sending what you expect. Nothing is in place yet to receive your calls, but you can still watch Salesforce try to call your server.
Make sure your logging is active. Go to a Contact record. Make a change and save it. If you make no change to a Contact record, your trigger will not be fired. And note, only the bits you change on the Contact will be sent across through the trigger you set up, plus or minus some outlier fields.
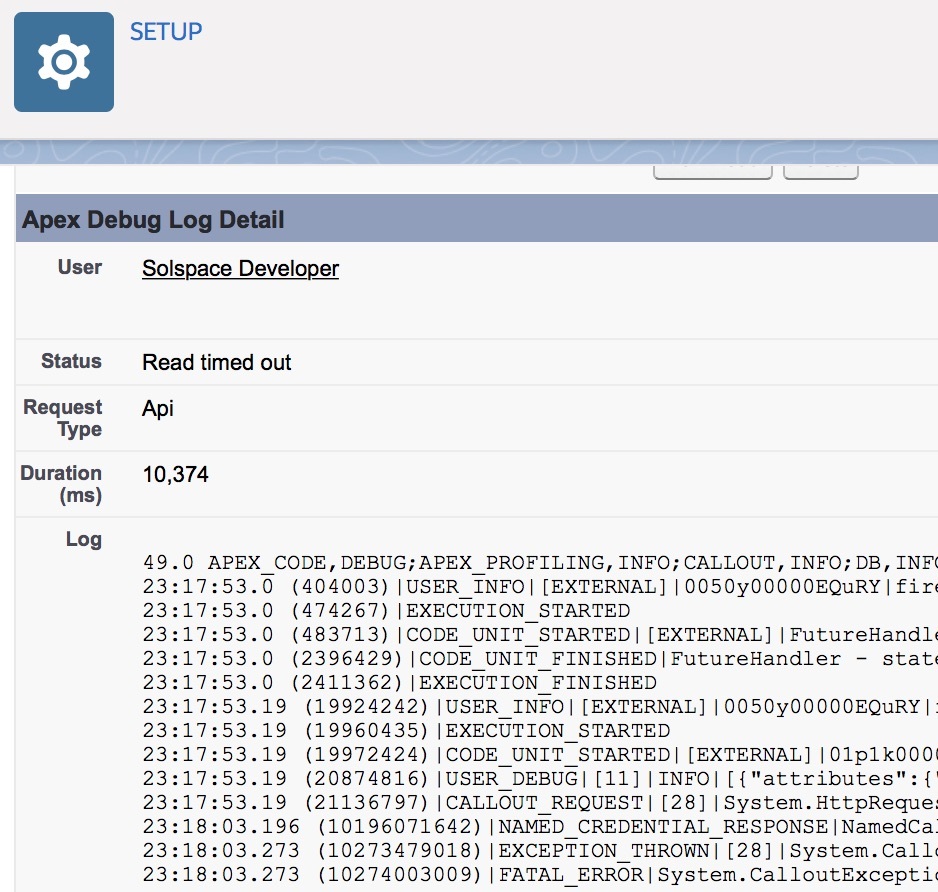
When you look at your logs you should see stuff like this...
Craft Plugin Controller
Now that Salesforce is set up and properly making calls to Craft, you can tell Craft what to do to receive those calls. That's the job of a controller in a Craft plugin.
Craft knows to treat urls of a certain format as calls to a controller. The default url format looks something like this:
https://dev.someserver.com/actions/yourSalesforceThing/registerContacts
The 'actions' segment in the url is the trigger that craft looks for to know that a url is trying to reach a controller. This trigger word can be changed in your Craft config file. The plugin handle segment refers to the official handle or name of your Craft plugin. Then the last segment refers to the specific controller method you want to invoke. A url like the above would be what you use in your Salesforce Named Credential.
A plugin folder and file structure to support all of this would be something like this:
[folder] plugins
	- [folder] yoursalesforcething
		- [file] YourSalesforceThingPlugin.php
		- [folder] controllers
			-[file] YourSalesforceThingController.php
		- [folder] services
			- [file] YourSalesforceThing_Service.php
The actual controller method for 'registerContacts' might look something like this:
public function actionRegisterContacts()
{
	// Log
	YourSalesforceThing::log('Request received from Salesforce: ' . print_r($_POST, TRUE), LogLevel::Info, TRUE);

	// Do some security

	// Loop over contacts sent from Salesforce
	foreach ($_POST['contacts'] as $contact)
	{
		// Invoke the main service
		$response[] = craft()->yourSalesforceThings_salesforce->registerContactFromSalesforce($contact);
	}

	// Return something in JSON back to Salesforce
	JsonHelper::sendJsonHeaders();
	exit(json_encode($response));
}
Note the use of a service in the Craft plugin. That's a best practice that Craft recommends we follow. You could dump all of your code into your controller if you were really lazy. But your code gets better and more testable when you break important activities out into separate service classes. We can talk about the service class next.
Craft Service Class
Your controller is the traffic cop. It routes incoming traffic. When that traffic lands, you want to do stuff with it. That's where services come in.
You might have a service method that handles security checks on incoming requests. You might have another service method that processes a valid request, etc.
Here's what the method in your service file might look like, the one that processes Salesforce contacts and turns them into Craft users.
public function registerContactFromSalesforce($contact)
{
	// Valid id?
	if (empty($contact->Id))
	{
		throw new Exception('No Contact ID was found.');
	}

	// Do they exist already?
	$user = $this->getUserBySalesforceContactId($contact->Id);

	// If no user, then start a fresh model for a new one.
	if (! $user)
	{
		$user = new UserModel();
		$user->getContent()->setAttributes([
			'userSalesforceContactId' => $contact->Id
		]);
	}

	// Populate the model further
	$user->username   = $contact->Email;
	$user->email      = $contact->Email;
	$user->firstName  = $contact->FirstName;
	$user->lastName   = $contact->LastName;

	// Populate custom fields
	$customFields   = [];
	foreach ($this->getContactFieldMap() as $key => $val)
	{
		if (! isset($contact->{$val})) continue;
		$customFields[$key] = $contact->{$val};
	}
	if (! empty($customFields))
	{
		$user->getContent()->setAttributes($customFields);
	}

	// Save the user
	craft()->users->saveUser($user);

	// Save user's group
	craft()->userGroups->assignUserToGroups($user->id, '1');
}
Your service class will have quite a few methods to do various tasks. But we care about the one that processes the actual Contacts from Salesforce. Here are the details of it.
First make sure that you have a valid ID for a Contact. Since what we get from Salesforce is an object, i.e. Contact object. The main ID for the contact will be stored like this: $contact->Id.
Next invoke a little service method to see if a Craft user already exists with that Salesforce ID. My code assumes that you have such a method. It would like something like this:
$criteria = craft()->elements->getCriteria(ElementType::User);
$criteria->userSalesforceContactId = $id;
$user   = $criteria->first();
if (! $user) return FALSE;
return $user;
After that, depending on the outcome of the check for an existing user, start up a fresh instance of the User Model. Then, whether you found a current user or spun up a new one, populate that model with the data you care about. I created a helper method to handle the mapping of custom Craft fields to Salesforce fields.
Next you can save the user. And after that you can assign the user to a Craft group.
Craft Config File
Salesforce is going to be making calls to Craft any old time it wants to. Craft thinks a form is being submitted to a controller. By default it will check for a CSRF token to make sure that the request is coming from a form it knows about and has registered a token for in its database. Since your Salesforce call is not coming from a form generated by Craft, you have to tell Craft to relax about testing for a CSRF token.
In Craft 3 this is easy. You just make an additional declaration in your controller class like this:
public $enableCsrfValidation = false;
In Craft 2 you need to trick the general.php config file to bypass CSRF for specific urls, like this:
$enableCsrfProtection   = TRUE;
if (isset($_SERVER['REQUEST_URI']) AND in_array(trim($_SERVER['REQUEST_URI'], '/'), ['actions/yourSalesforceThing/registerContacts']))
{
	$enableCsrfProtection   = FALSE;
}
And then in the actual config array, you can dynamically set the 'enableCsrfProtection' value, as below:
'enableCsrfProtection' => $enableCsrfProtection,
Craft Logging
I've mentioned a few times that Salesforce is going to send requests to Craft whenever it wants to. You won't be around to see your code running and watch errors land. You have to log all of that stuff. You set up logging in Salesforce previously. Now you need logging in Craft as well, at least while you're working the kinks out of the system.
Craft's logging class is easy to work with. Here's what a line of logging would look like. You'll remember something like this from above:
YourSalesforceThingPlugin::log('Response sent to Salesforce: ' . print_r($response, TRUE), LogLevel::Info, TRUE);
The line above invokes the logging helper through your plugin. Craft knows when you do this to just create a log file specifically for your plugin. Note the log level and the last argument of TRUE. That last argument forces logging to take place even when Craft is not in dev mode.
You can find your log on your server inside the 'storage' folder on the server. For Craft 3 look in 'logs'. For Craft 2 look in 'runtime > logs'.
Testing
When I develop new code there are 2 things I do constantly. I constantly think about security and I constantly test. I try to break the project down into smaller and smaller bits. I check security on each bit and I test each bit for functionality. Here are some key components you'll want to test individually as you develop. If you test as you go, you will greatly reduce the number of things to check when the whole project fails somehow.
Remember to test your HTTP basic authentication. Just pull up a browser and try to hit one of your Craft controller endpoints. You should be challenged for a username and password. And when you enter the correct credentials you should be allowed through. Salesforce will be trying the same thing and it will fail more quietly than your direct test will.
Using the Salesforce Developer Console you can check snippets of code in real time. You can get real time errors. I recommend that you test each of your Salesforce callout components this way to uncover and resolve errors. Be systematic and meticulous. This is the software developer mindset. You may as well get your mind around this way of working sooner than later.
In the Salesforce Developer Console, make sure you can get Salesforce to call out to any server anywhere. Once you get that working test your Named Credential. Make sure it can successfully make a call to your server specifically.
Create a single PHP file and run it on your server. This file will receive requests from inside Salesforce while you are testing and developing. It totally bypasses everything 'Craft' and just echos back what it's receiving from Salesforce. These little files are invaluable in the testing process on API integrations. They greatly reduce the variables you are testing for and help you find problems quickly.
Here's one of my favorites. Create an additional single PHP file. Run it on the same server as above. Write a cURL call into that file and use that to simulate what Salesforce will see when it starts making calls to Craft. You can hard code a sample Contact object into that cURL call and you can debug how Craft will react to that incoming data. Here's my cURL code in case you are lazy:
//open connection
$ch = curl_init();

//set the url, number of POST vars, POST data
curl_setopt($ch,CURLOPT_URL, $url);
curl_setopt($ch,CURLOPT_POST, count($fields));
curl_setopt($ch,CURLOPT_POSTFIELDS, $fields_string);
curl_setopt($ch,CURLOPT_FAILONERROR, true);

//execute post
$result = curl_exec($ch);

//info
$info   = curl_getinfo($ch);
//print_r($info);

//errors
$error = curl_error($ch);
print_r($error);

//close connection
curl_close($ch);

print_r($result);

exit();
That code just opens up a cURL connection to another server. It passes an array of variables across as a POST request. Then it returns the response it gets. I've saved hundreds of hours over the years by using this method. Slice your debugging work into tiny pieces like this and you will be one of the fastest developers on the market.
Wrap-up
Well there it is. You now have the building blocks of making calls from inside Salesforce out to Craft. This is a hugely useful capability. One your client will be very grateful you have available.