Guides
How To Spin Up Craft 3 On AWS EC2
Overview
This guide helps Craft CMS developers quickly set up a Craft CMS 3 compatible AWS EC2 instance. This guide assumes that AWS Aurora Serverless will be used as the database. By the time you complete this guide you will be able to configure AWS security groups, set up an RDS database and quickly launch Craft on an EC2 instance.
Step 1: Security Groups
Login or sign-up for an AWS account at console.aws.amazon.com.
Step 2
Create a new Security Group that your EC2 instance will use. You may as well learn AWS Security Groups as soon as possible. You will suffer mightily until you do.
- Go to https://console.aws.amazon.com/ec2.
- Click
Security Groupsunder Network & Security. - Click
Create security group - Give the new security group a name. Make sure you name it something you can easily pick out of some menus in future steps. Give the group a useful description. You maye be using this security group for years to come. Be kind to your future you.
- Leave the default VPC in place as-is. (If you have multiple VPC's running in your AWS account then your skills are likely already beyond this guide.)
Step 3
Set inbound security rules on your new security group.
- Under Inbound rules click
Add rule - Choose
SSHfor Type. ChooseAnywherefor Source. (You can restrict which IP address range can use SSH. Just supply an appropriate IP address directive instead of the Anywhere option.) - Under Inbound rules click
Add ruleagain. This time chooseHTTPunder Type. ChooseAnywherefor Source. This opens port 80 to incoming web traffic. If you want to send HTTPS traffic to your EC2 instance, chooseHTTPSunder Type. That will allow traffic through port 443.
Step 4
Set outbound security rules on your new security group.
- Under Outbound rules click
Add rule - Choose
MySQL/Aurorafor Type. ChooseAnywherefor Destination. This will allow your EC2 instance to make calls to your RDS database. - Under Outbound rules click
Add rule - Choose
Allfor Type. ChooseAnywherefor Destination. This will allow your EC2 instance to make calls to yum, composer and other necessary services. - Click
Create security group
Step 5
Create a Security Group for your RDS instance.
- Navigate to Security Groups again.
- Click
Create security group. Provide a name and description and choose the same VPC as before, your default VPC. - Under Inbound rules click
Add rule - Choose
MySQL/Aurorafor Type. For Source you can isolate access to servers running on the security group you just created in the step above. Leave the Source asCustom. Click in the little search field right next to Custom. Scroll until you find the security group you just created for your EC2 instance. Select that group. - Click
Create security group
Step 6: Create RDS Database
Create an RDS database by going to https://console.aws.amazon.com/rds#databases.
- Click
Databasesin the left nav. - Click
Create Database - Choose
Standard Create - Choose
Amazon Aurora - Choose
Amazon Aurora with MySQL compatibilityunder Edition - Choose
Serverlessunder Capacity type - Choose
Aurora (MySQL 5.7) 2.07.1under Version - Under Settings fill out the form with a database identifier, username and password and confirm password.
- Under Capacity settings leave the capacity unit defaults as-is. Under Additional scaling configuration click
Pause compute capacity after consecutive minutes of inactivityand choose 5 minutes. - Under Connectivity find Virtual private cloud (VPC). Choose the VPC you've been using previously.
- Under Subnet group choose the subnet group you've used previously.
- Under Existing VPC security groups choose the RDS security group you created above. If a default was preselected, you can delete it from the list.
- Under Additional configuration click
Data API. This will allow you to query your database from inside the RDS console. - Under Additional configuration provide
craftas the initial database name. Leave the other defaults as-is. - Click
Create Database
Step 7
Upload key pairs
If you are new to AWS you likely do not yet have your SSH key uploaded.
- Grab your public key or create one if needed. My favorite tutorial for this is from Github. Follow the steps to create a key if needed. Then use the pbcopy command to get your public key onto your clipboard so that you can paste it into AWS. Tutorial here
- Go to EC2: https://console.aws.amazon.com/ec2#KeyPairs.
- Click on
Actionsat the top right. - Choose
Import key pair - Enter a name.
- Paste your public key, from above, into the textarea.
- Click
Import key pair - You can now use this key pair when you create an EC2 instance.
Step 8
After submitting your create database request you will be redirected to the main RDS page. Click to go into your list of databases and navigate to your previously created database’s details page by clicking in the list on the title. Wait for your new database to become active (if needed refresh the page a few times). Once active, grab the endpoint. It’ll be something like test-craft-blog-post.ciflokxjjpa1k.us-west-1.rds.amazonaws.com. You’ll need this in a later step.
Step 9: Create EC2 instance
- Go to EC2: https://console.aws.amazon.com/ec2.
- From the EC2 Dashboard, click
Instances - Click
Launch instances - Find Amazon Linux 2 AMI in the list and click
Select - Choose the default,
t2.micro, as your instance size. - Click
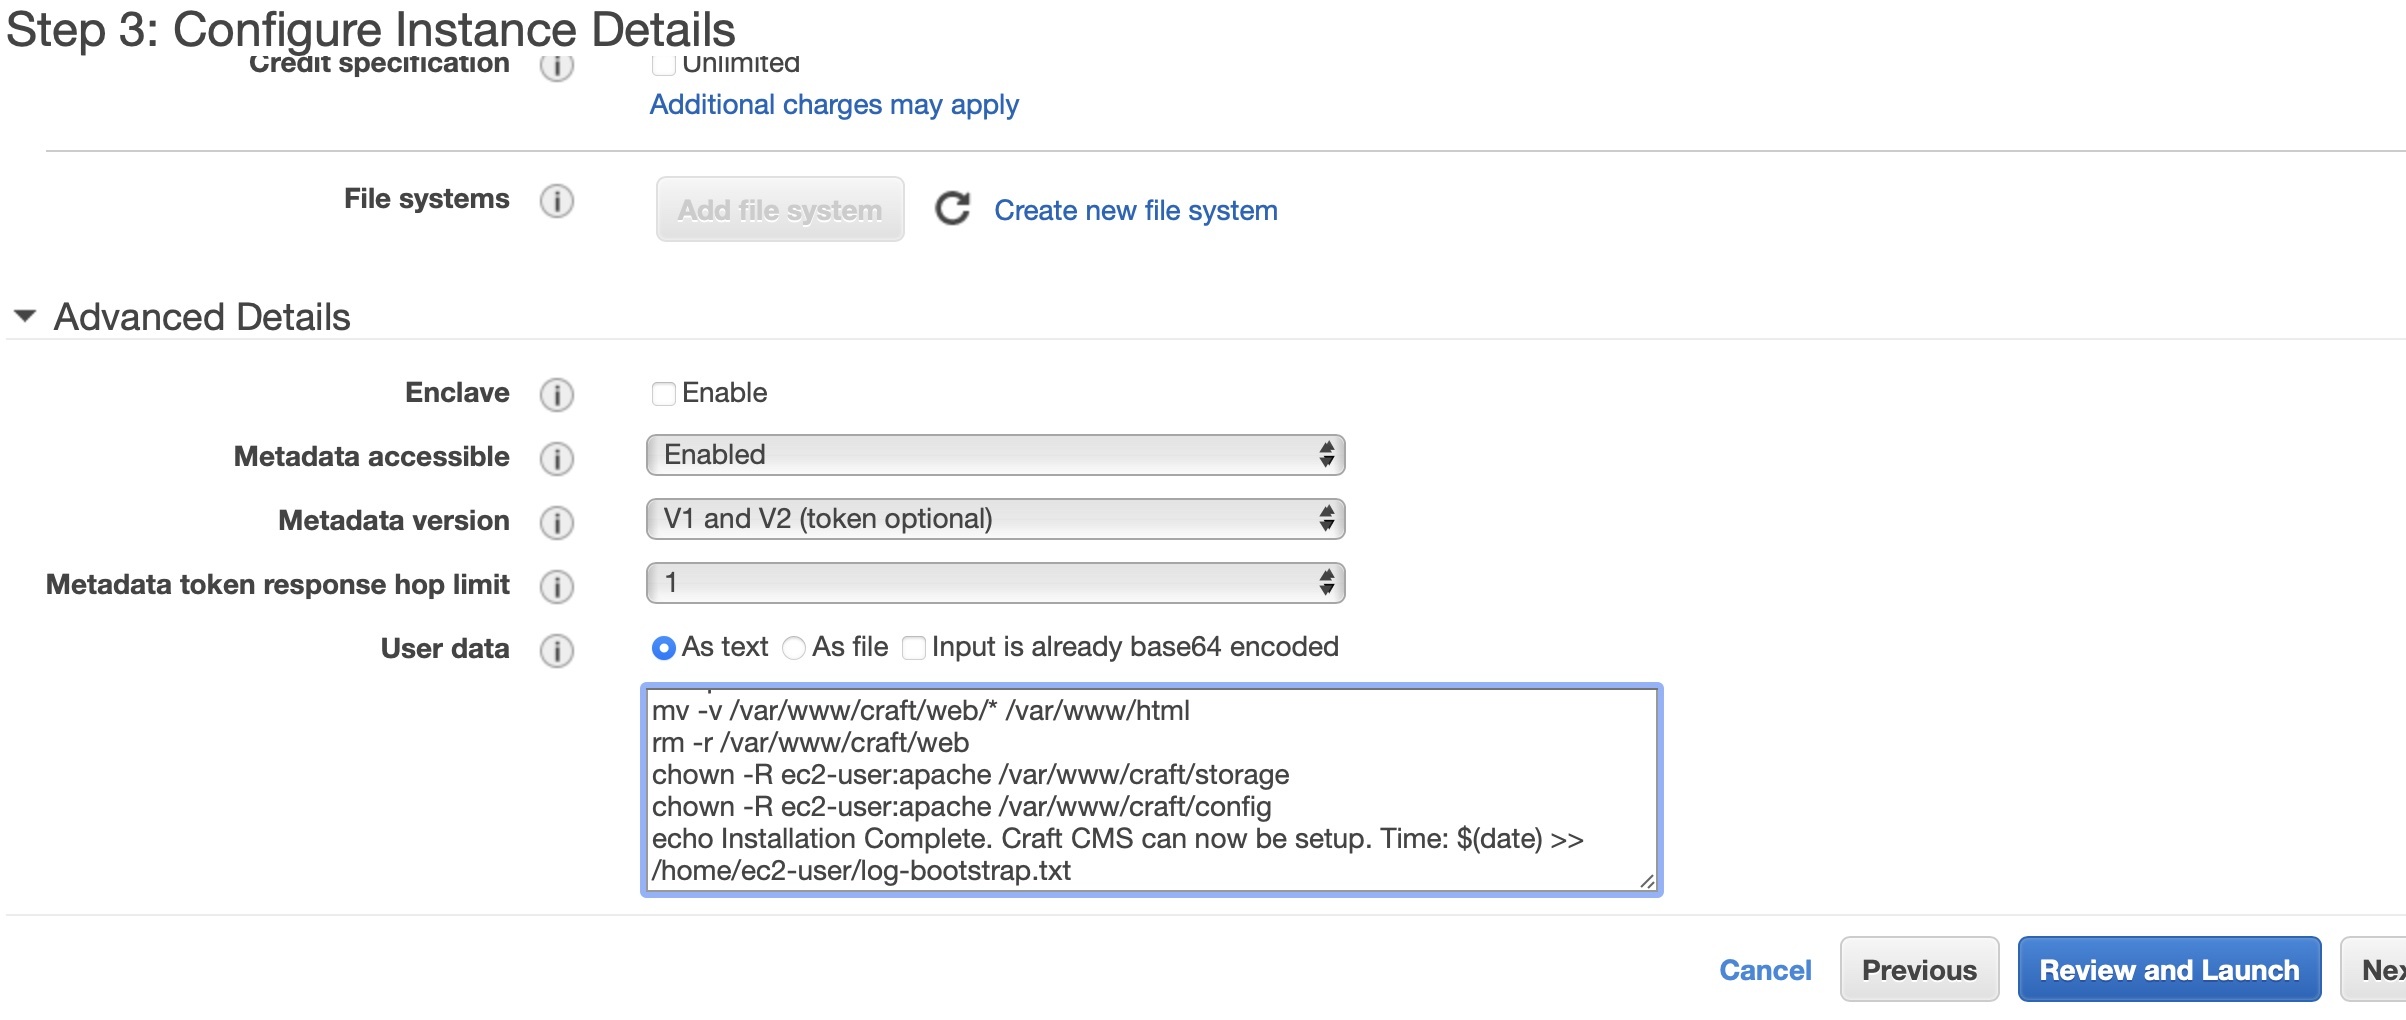
Next: Configure Instance Details - In the User data field at the bottom of the screen enter the block of commands provided below. These will install Apache, PHP, MySQL, Composer, some necessary PHP extensions and Craft itself.
#!/bin/bash
echo Bootstrap script starting at $(date) >> /home/ec2-user/log-bootstrap.txt
echo Updating OS and installing webserver at $(date) >> /home/ec2-user/log-bootstrap.txt
yum update -y
yum install -y httpd
yum install -y amazon-efs-utils
yum install -y git
chkconfig httpd on
echo Setting folder permissions at $(date) >> /home/ec2-user/log-bootstrap.txt
usermod -a -G apache ec2-user
chown -R ec2-user:apache /var/www
chmod 2775 /var/www
find /var/www -type d -exec chmod 2775 {} \;
find /var/www -type f -exec chmod 0664 {} \;
systemctl start httpd
systemctl enable httpd
echo Installing PHP at $(date) >> /home/ec2-user/log-bootstrap.txt
amazon-linux-extras install php7.4
echo Installing PHP extensions at $(date) >> /home/ec2-user/log-bootstrap.txt
yum install -y php-gd php-xml php-mbstring mysql
systemctl restart httpd
echo Installing Composer at $(date) >> /home/ec2-user/log-bootstrap.txt
export HOME=/root
curl -sS https://getcomposer.org/installer | php
mv composer.phar /usr/local/bin/composer
chmod +x /usr/local/bin/composer
echo The composer version is $(/usr/local/bin/composer --version) >> /home/ec2-user/log-bootstrap.txt
echo Preparing to install Craft CMS. Time: $(date) >> /home/ec2-user/log-bootstrap.txt
mkdir /var/www/craft
/usr/local/bin/composer create-project craftcms/craft /var/www/craft
cd /var/www/craft
echo Installing Craft CMS. Time: $(date) >> /home/ec2-user/log-bootstrap.txt
composer install
mv -v /var/www/craft/web/* /var/www/html
rm -r /var/www/craft/web
chown -R ec2-user:apache /var/www/craft
chown -R ec2-user:apache /var/www/craft/storage
chmod -R 2775 /var/www/craft/storage
chown -R ec2-user:apache /var/www/craft/config
chmod -R 2775 /var/www/craft/config
chown -R ec2-user:apache /var/www/craft/.env
chown -R ec2-user:apache /var/www/html
chmod -R 2775 /var/www/html/cpresources
sed -i "s/dirname(__DIR__)/dirname(__DIR__) . '\/craft'/" /var/www/html/index.php
echo Installation Complete. Craft CMS can now be setup. Time: $(date) >> /home/ec2-user/log-bootstrap.txt
echo Bootstrap script done at $(date) >> /home/ec2-user/log-bootstrap.txt
- Click
Review and Launch
Step 10
- Click on
Edit security groups - Choose the security group that you previously created for your EC2 instance. That's the one where you opened SSH access as well as HTTP.
- Click
Review and Launch - Click
Launch
Step 11
- Select your SSH key from the list.
- Click
Launch Instances
Step 12
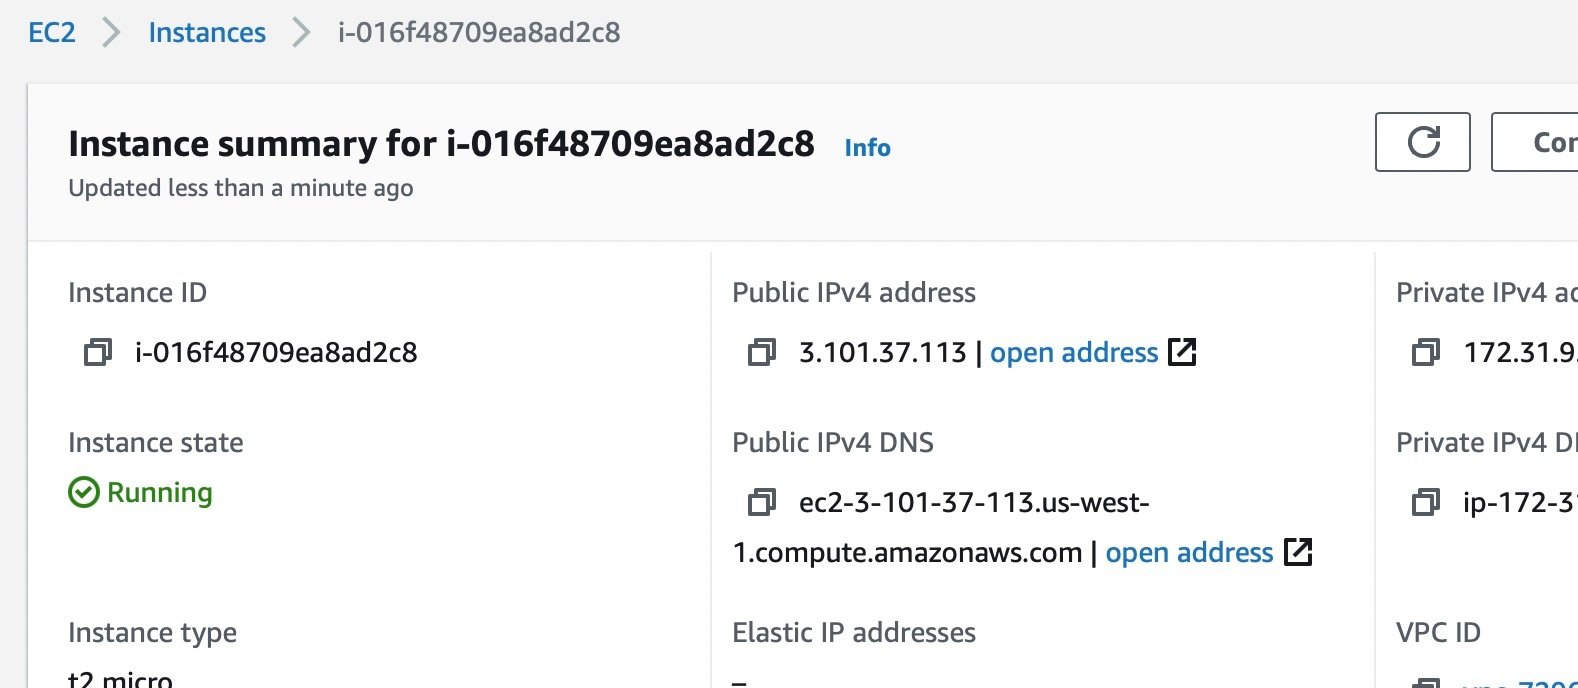
Go back to your EC2 instance in the EC2 Console. Once the instance is running, grab the Public IPv4 IP address.
Step 13
SSH in to your new instance using Terminal on a Mac or Putty on Windows or such stuff. You are ec2-user. You don't need a username or password since the new server instance already has your SSH key. You'll just get right in.
ssh ec2-user@3.101.37.113
You should see something like this...

Enter yes. You should see this...

You can do a little happy dance. And then you can setup Craft.
Step 14: Setup Craft
Start the Craft setup wizard by entering the command below.
/var/www/craft/craft setup
- For database driver choose
MySQL - For database server name copy and paste your RDS endpoint. Something like:
test-craft-blog-post.cifypaajpa1k.us-west-1.rds.amazonaws.com - For database port enter
3306 - For database user enter RDS database username.
- For database password enter RDS database password.
- For database name enter
craftor whatever you named the database in step 14. - For database prefix, leave blank.
- Enter
yeswhen prompted to Install Craft now? - Complete the remaining setup steps as prompted; username, email, password, etc.
Step 15
Optional: Add an .htaccess directive to hide index.php in all urls.
- Enter this command:
nano /var/www/html/.htaccess
Paste this block into the file you're creating:
<IfModule mod_rewrite.c>
    RewriteEngine On

    # Send would-be 404 requests to Craft
    RewriteCond %{REQUEST_FILENAME} !-f
    RewriteCond %{REQUEST_FILENAME} !-d
    RewriteCond %{REQUEST_URI} !^/(favicon\.ico|apple-touch-icon.*\.png)$ [NC]
    RewriteRule (.+) index.php?p=$1 [QSA,L]
</IfModule>
- Enter
CTRL + Xand save your work.
Step 16
Optional, continued.
To allow .htaccess files to work on your site, you have to enable the override feature in Apache.
- Enter this command:
sudo nano /etc/httpd/conf/httpd.conf
- Use
CTRL + Wto search for this:
<Directory "/var/www/html">
- Inside that block look for this directive:
AllowOverride None - Change that to:
AllowOverride All - CTRL + X out of there and confirm your changes.
- Enter this command to restart Apache so that your new directive will take effect.
sudo systemctl restart httpd
Step 17
Login to Craft - Hit the IP address of your EC2 instance + /admin and login to Craft. Something like...
http://54.183.4.135/admin
Step 18
SFTP to your EC2 instance.
You already know how to SSH in to your instance and manipulate stuff. You can also SFTP to your server to work with the file system the way you're used to. In your SFTP client use these credentials:
- Server is your instance's IP address. Something like:
54.183.4.135 - User Name is
ec2-user - Password can be left blank since your SFTP client should know how to find your SSH key when your instance asks for it.
Step 19
Done! Get to Work!!