Spinning Up a Craft CMS Development Site on Amazon EC2

Because of our Aftercare program we take on a lot of clients who already have Craft or ExpressionEngine sites running. They want us to take over management of the sites, make changes, do mobile responsive conversions, fix system bugs and the like. We don't want to work on the client's live site of course. We prefer to set up a dev site where we don't have to care about breaking things.
You might also want to spin up a dev site just to have a safe place to work on something new you are developing. You don't always want to work on your local machine, but you don't want to pay much money if you can avoid it.
This tutorial will show you how to go from nothing to having a Craft CMS dev site running on AWS.
You have probably heard of AWS by now, Amazon's Web Services. They're taking over the world. So much of what we use and see on the web is sitting on AWS already. You may as well get your feet wet and know how it works.
Before you read this next paragraph, keep in mind that I enjoy time travel. I wrote this to a previous version of me, the one who was totally clueless and terrified of sys admins, the command line, clouds, machines and toothpaste.
We'll be setting up an EC2 (Elastic Compute Generation 2) instance of Amazon's flavor of Linux. We'll add PHP and MySQL to it along with some extensions that Craft requires at the server level. Lastly, we'll register a cheap domain name and point it at our EC2 instance so that we can have cleaner urls.
This post was inspired by a really good tutorial written by Christophe Coenraets about setting up WordPress on AWS in 5 minutes.
Step 1 #
Sign-up for an AWS account at aws.amazon.com.
Step 2 #
Once you are logged in, make sure you are seeing this AWS home screen:
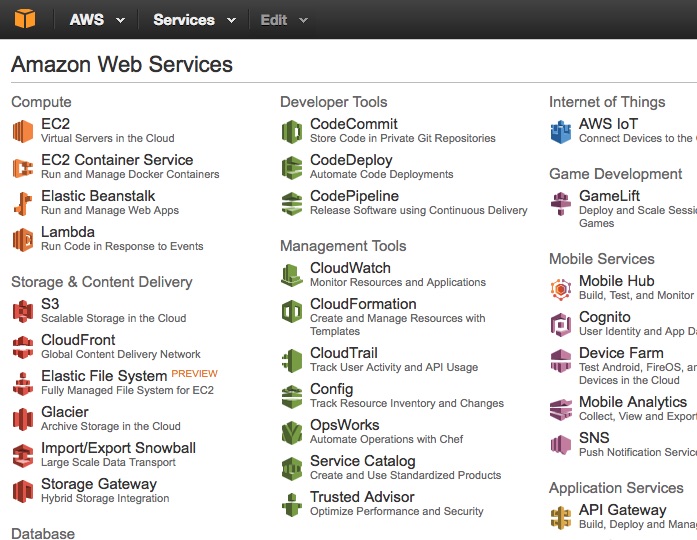
Step 3 #
Under 'Compute' click 'EC2'.
Step 4 - Import your public SSH key to AWS #
Once you have an instance running you will want to login to it. You can't do this unless the server recognizes you and thinks you're you. So you need to upload your ssh key. Huh? No gots? Yeah, you have one. You just may not know how to copy it into AWS yet.
Click on Key Pairs in that main EC2 menu there.
Click on Import Key Pair there at the top.
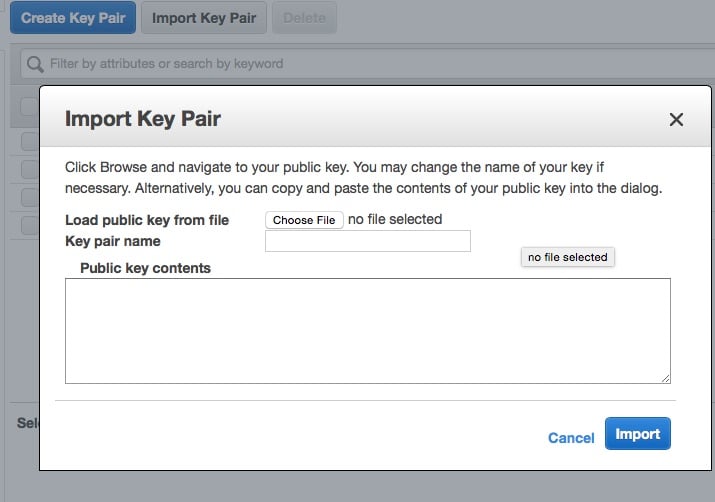
Give your key a name for inside Amazon. This won't really matter too much. The next bit matters a lot.
Get into your machine and get the contents of your public key. I assume you are not a complete circus animal and that you are running on a Mac. Go into Terminal on your mac and type the following. (Note that the dollar sign there is just shorthand in tutorials like this telling you that you are at the command line. You should really only type the ls -a ~/.ssh part below.
$ ls -a ~/.ssh
You will most likely see a list of files with this one being in the list: id_rsa.pub. If you don't see that rascal, follow this tutorial to get it there.
Once you know you have a public key, grab its contents so that you can paste them into AWS.
$ pbcopy < ~/.ssh/id_rsa.pub
That will put the contents of your public key into your clipboard so that you can copy and paste into Amazon. Paste into the Public key contents window in that Import Key Pair dialogue. Click Import to save.
Step 5 - Launch an instance #
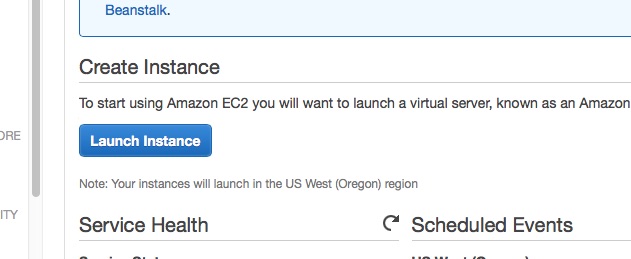
In the main EC2 menu, click the big blue 'Launch Instance' button under 'Create Instance'.
Step 6 #
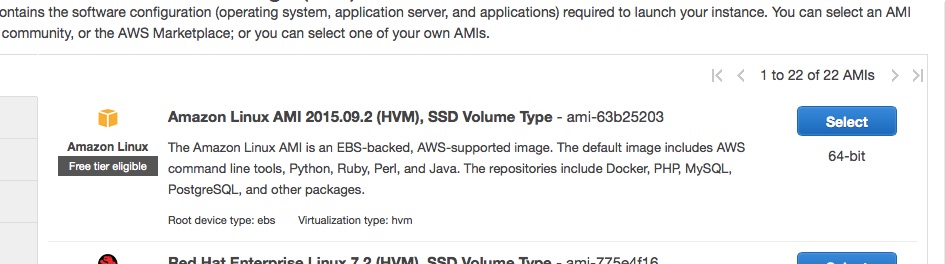
Choose your OS flavor: Amazon Linux
You are now being asked what kind of EC2 instance to spin up. Most of us are familiar with running LAMP stack apps like Craft CMS. The L stands for Linux. Amazon's flavor of it is pretty handy and just about ready to go with what we need. So choose that one. This flavor has the added advantage of being Free tier eligible. So for a year you can have free web hosting as long as you use the instance less than 750 hours per month.
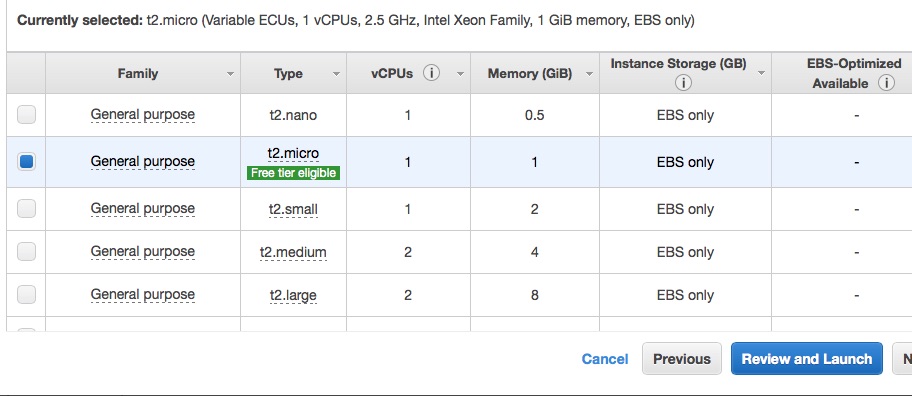
Step 7 - Choose an Instance Type #
AWS is designed to scale. You pay for what you use and you do not have to commit to massive amounts of scalability if you're not really going to use it. The 'micro' instance is Free tier eligible, so choose that one. Click the big blue 'Review and Launch' button.
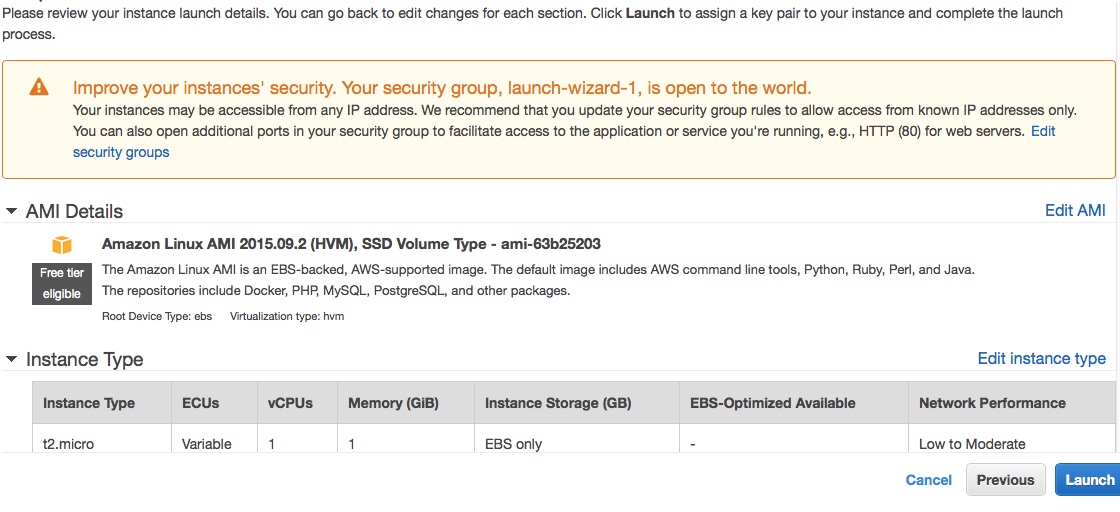
Step 8 - Launch! #
You're shown a warning about the level of the security group that defaults for the instance you're spinning up. Amazon calls this the launch-wizard-1 security group. AWS security groups are beyond the scope of this tutorial, but for our purposes, this group will be fine.
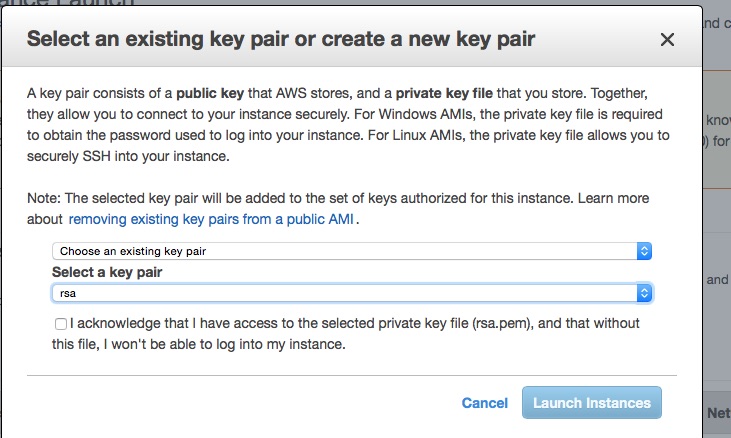
Step 9 - Select key pair #
You imported your key already so now you just need to choose it from the list.
Step 10 - Verify that your EC2 instance is running #
So you went away and grabbed a cup of tea. Then you came back to check on your EC2 instance. Is it running yet?
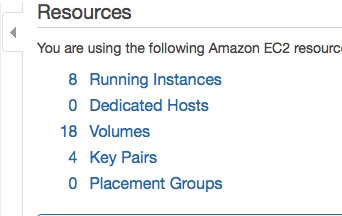
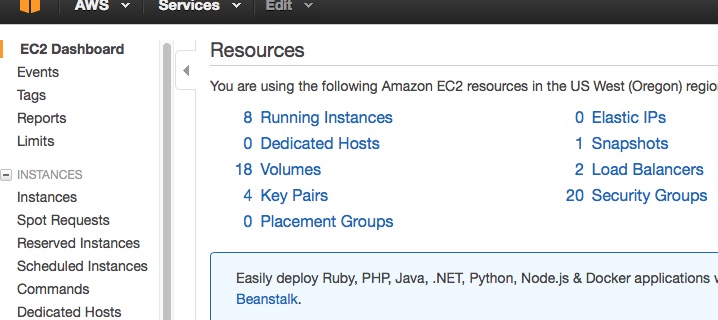
Be logged into aws.amazon.com. Go to the home screen. Click EC2. You will see a list of Running Instances. You will likely see a 1 there. My account has a few running so mine shows 8 Running Instances.
Step 11 - Tinker with your new EC2 Instance #
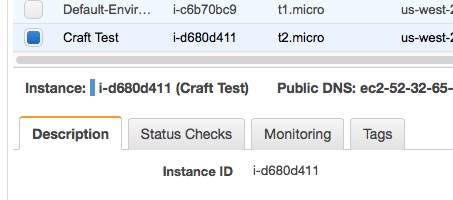
Click on the Running Instances link. You will see a list of instances and their status like the following. The one with the blank in the name column is the one you just set up. Let's name it.

Step 12 - Name your instance #
You'll probably run a bunch of sites from AWS eventually. So keep track of everything better with good naming and tagging. Just hover over the instance you want to edit. You'll see a pencil icon. Click that and give your instance a name.
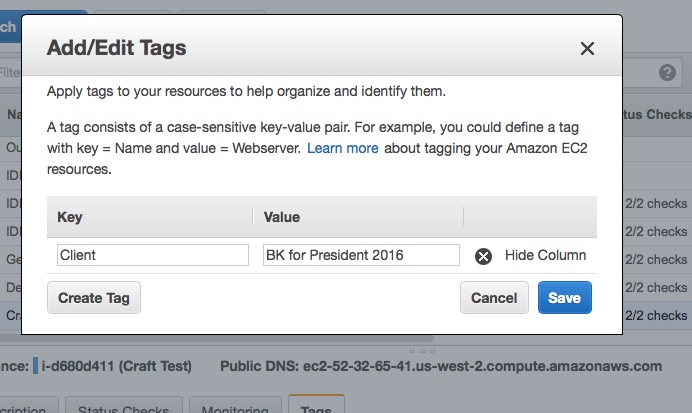
Step 13 - Tag your instance #
You'll run instances for various clients and if you are a better business person than I am you will have sense enough to bill those clients for the money you spend on them in AWS. Use tags to slice and dice your costing.
Click on the Tags tab. Click on Add / Edit Tags. You will get a dialogue box. AWS tagging is all key / value pair based. This means it's hugely flexible and also a little confusing. I recommend giving a tag name of 'Client' and a value of 'Whatever Client Name'.
Step 14 - Load your instance in a browser #
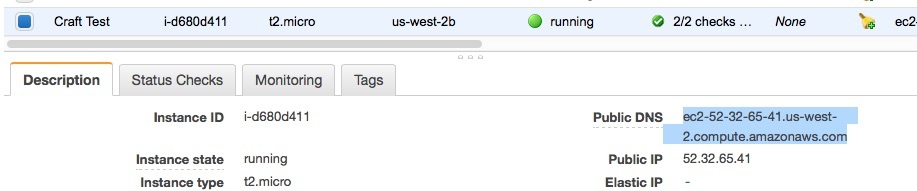
You're like me and you want gratification instantly. So you want to try to hit this new website in a browser. AWS gives every instance a url. The format is like this: ec2-52-32-65-41.us-west-2.compute.amazonaws.com. Here's how to find the url of your instance.
Click on your instance in the list of EC2 instances. When you do, the lower panel on the page will show details of your instance. In that first Details tab find the 'Public DNS' area. You'll see a url there. That's yours.
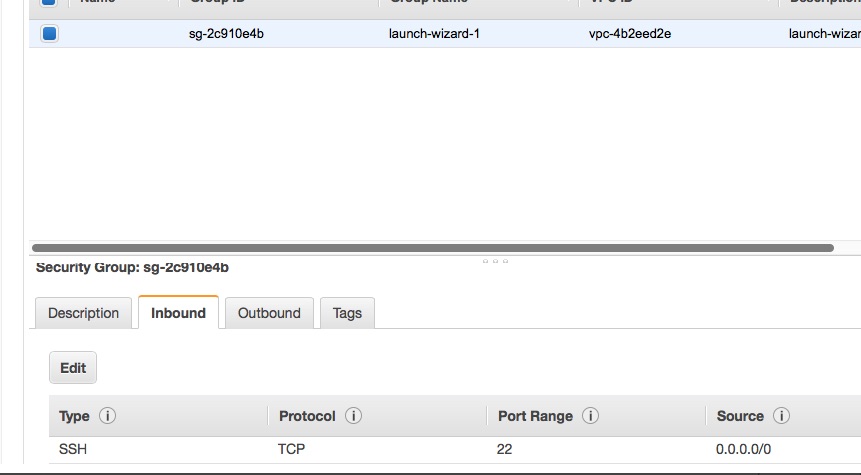
Step 15 - Open up access to your instance #
You loaded that URL into a browser didn't you? Nothing came up, huh? Yeah, you need to open it up.
So look in that Details tab just under Public DNS. You should see Security Groups with launch-wizard-1 as the value. Click on that. You will come to a list of your security groups with launch-wizard-1 already selected. In the lower panel on the page you will see a Description tab and an Inbound tab. Click on that Inbound tab. You'll see the specific inbound traffic rules for that group.
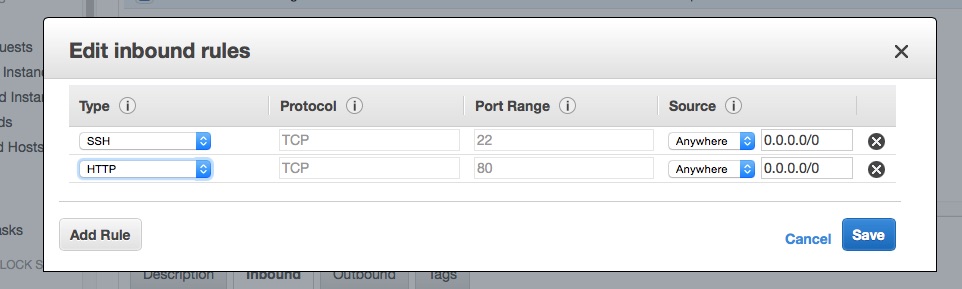
Click Edit and then Add Rule. Choose HTTP from the pulldown. Click Save.
Now try loading your site again. Still doesn't work, huh? Yeah, we have a bare metal box right now with no Apache, no MySQL, no PHP. We got no L-A-M-P stack other than the L. So let's log in.
Step 16 #
Login to your server and install junk.
So go back into Terminal on your Mac and type this:
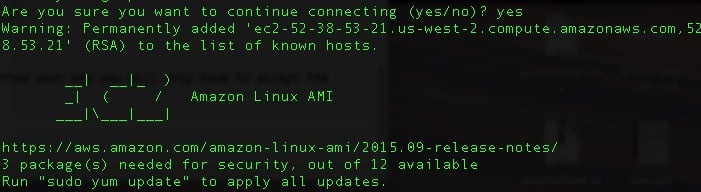
$ ssh ec2-user@ec2-52-ff-ff-ff.us-west-2.compute.amazonaws.com
Replace those ff's with the actual IP address numbers in your server URL. Since you imported your key you will only have to accept the authenticity of your first connection time and then you'll be in for good.

Once you are in you will know it because your Terminal window will look something like this:
The server is loaded with YUM which is a nice little package manager for Linux. It makes updating server code easier. You're being asked to run the yum updater. It's a good idear. So do this:
$ sudo yum update
Yum will ask you to confirm the action you are about to take. You can type 'y'. Also, the 'sudo' part of the command above means 'do this as a super user'. If the ec2-user that you are logged in as is allowed to sudo stuff, then it can. The sudo stuff is kind of a safeguard to help you avoid nuking your server on accident. We have a few sudo commands to issue right now. So for convenience we'll just force ourselves to be logged in as the super user (AKA root) so we can save keystrokes. Since this is a brand new server, there's nothing to nuke. We don't have to be that careful.
$ sudo su
Step 17 - Install and start Apache #
We have the L. Now we will install the A of our LAMP stack.
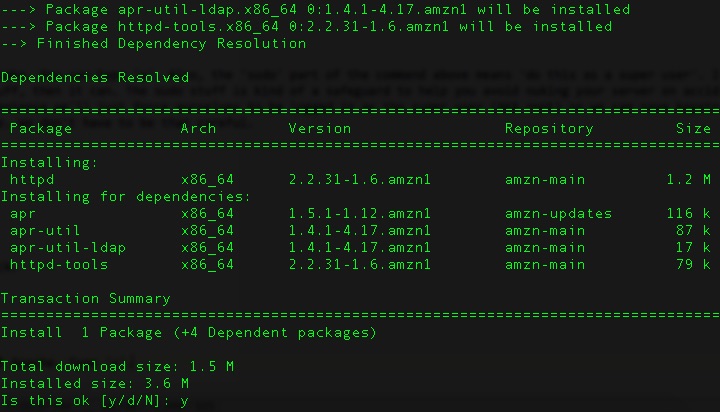
$ yum install httpd
You'll be asked to confirm again that you want to install Apache. Type 'y'.
You can start Apache now and see if there's actually a server available on the web.
$ service httpd start
Hit the Public DNS URL provided by AWS in your web browser. You should see this:
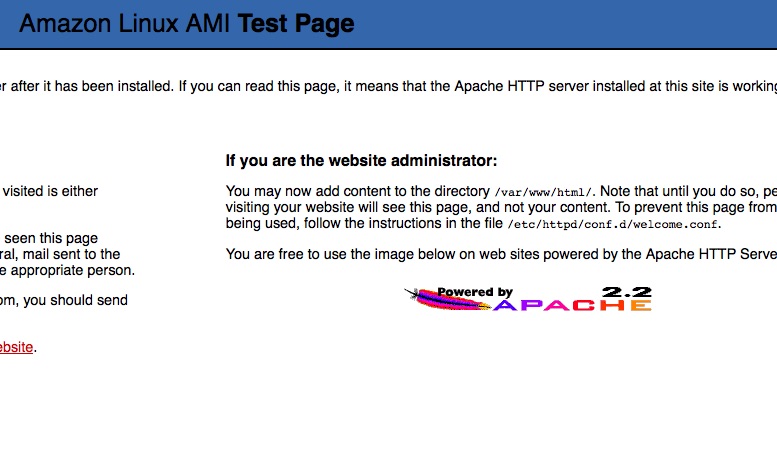
See it? GREAT!!
Don't see it? :(
Ok make extra double sure that the security group assigned to the instance you spun up has HTTP open on port 80 as one of the security rules. As long as Apache is installed and running and HTTP port 80 is open you should see your site.
Step 18 - Install PHP #
Time for the P part of our LAMP stack. We're awful close now. There's now one last hard thing a little farther down and then we're killing it!
$ yum install php php-mysql
You confirmed and installed PHP. Any change like this requires and Apache restart. Apache caches a bunch of junk. You have to restart it to see base level changes like this one.
$ service httpd restart
You'll see this with each restart:

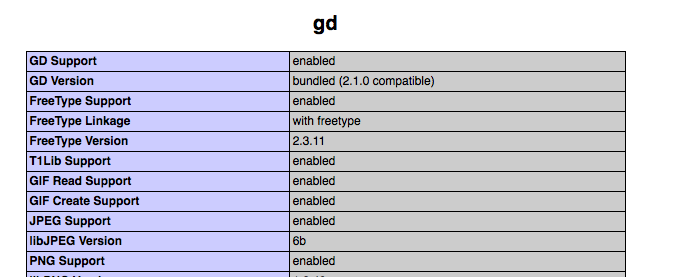
Our PHP instance will need a few extensions to support Craft.
- Mcrypt
- Multibyte String Extension
- GD Extension
PHP has a handy method for checking what's running so let's set up for that real quick.
$ cd /var/www/html
$ nano test.php
Nano is a little text editor built into the command line there in Linux. It lets you edit files on the server. You have started a new file. Add this to the empty file:
<?php phpinfo(); ?>
Now click CONTROL + X to exit. You will be asked to save your changes. Confirm that. You will be asked to confirm the file name. Just hit Enter.
Now go see your file in a browser: http://ec2-52-38-53-21.us-west-2.compute.amazonaws.com/test.php
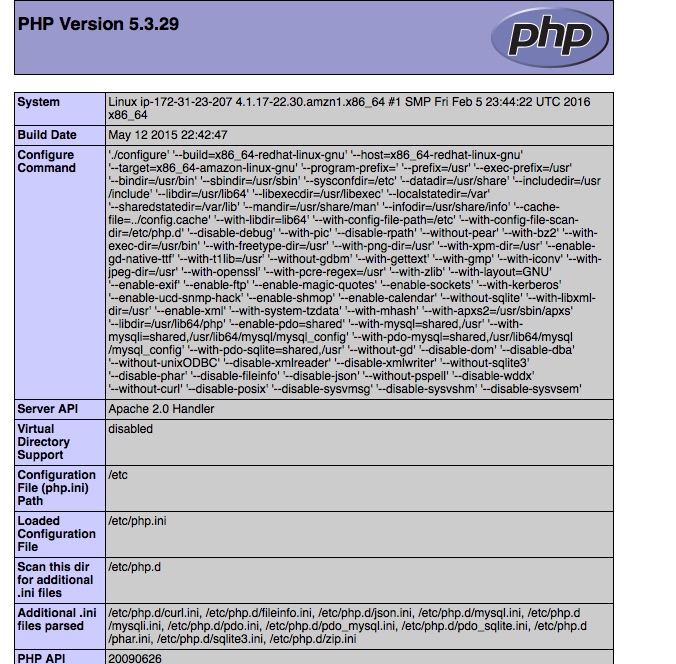
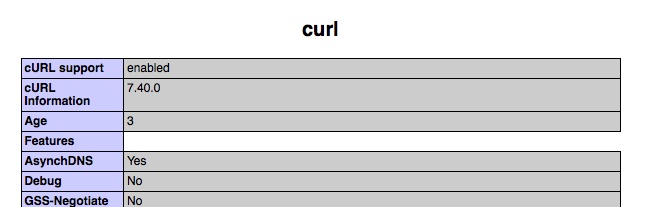
You can search that page for the various extensions Craft requires. For example, cURL is already running in this flavor of PHP.
Install the remaining extensions.
$ yum install php-mcrypt
$ yum install php-mbstring
$ yum install php-gd
Remember to restart Apache for all of these changes to kick in.
$ service httpd restart
You can refresh your test.php page and see these PHP extensions running now: http://ec2-52-38-53-21.us-west-2.compute.amazonaws.com/test.php.
Step 19 - Install MySQL #
Now for the M part of the LAMP stack. Just about done scaffolding.
$ yum install mysql-server
You have to start MySQL because it acts like a server too.
$ service mysqld start
Create a first database in MySQL
$ mysqladmin -uroot create craft
Remember the database name of 'craft' for later.
Now tighten up your MySQL server by running the secure installation wizard. Thanks again to Christophe Coenraets for this.
$ mysql_secure_installation
Answer the wizard questions like this:
- Enter current password for root: Press return for none
- Set Root Password: Y
- New Password: [Enter your new password and remember it.]
- Remove anonymous users: Y
- Disallow root login remotely: Y
- Remove test database and access to it: Y
- Reload privilege tables now: Y
Great JOB!!!

Step 20 - Gravy #
You have set up a LAMP stack.
If you want, you can skip the rest of this tutorial since you now have an EC2 instance running. You have a URL that you can hit that will act like a domain name for you to access your dev site. You can just open up your FTP client and access the server to upload Craft. Since your SSH key is what Amazon is going to check instead of a password, you should be able to just use the c2 URL as the FTP host and ec2-user as the FTP username and get right in. Just leave the password blank.
Once logged in, you will be in the home directory for the ec2-user. Just navigate up out of that directory and down into /var/www/html and you will recognize where you are on a normal Linux server.
You can do whatever at this point, but I promised you we would run Craft from this thing and do so under a proper domain name. So now for those steps.
Step 21 - Register a dumb dev domain #
Why not just use Amazon's URL? Or just create a subdomain somewhere?
I really like the cleanness on my client dev sites of having a separate dedicated domain name. I get to avoid funkiness in the Craft config file too. It just feels more professional. Some domains are super cheap these days too, like $10 bucks a year. Go to Namecheap and try to register something.website and you'll see some cheapness. Any domain works.
Once you have a domain name, you need to point it's DNS to AWS name servers. AWS calls their nameserver router thing 'Route 53'.
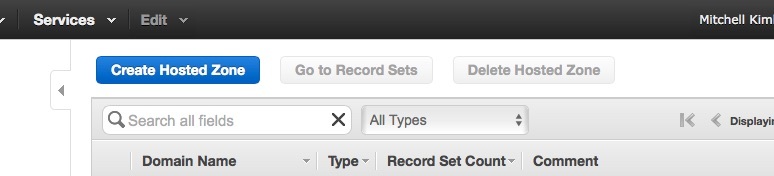
Go into your AWS account and click to the home screen. Look for 'Route 53' in the list of services.
Under DNS Management click on Hosted Zones. You probably see nothing in that list. Click 'Create Hosted Zone'.
Name the zone.
You'll see a default record set for your new zone.
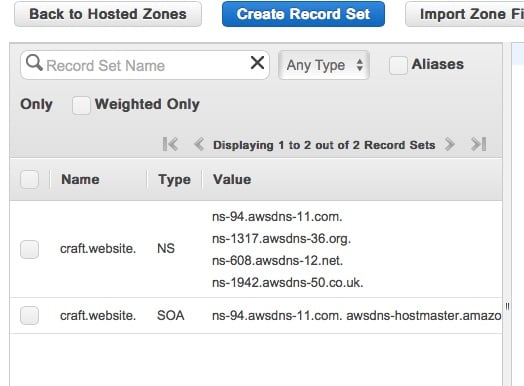
Those 4 values under Type:NS are your name servers. Take those 4 values and paste them into your nameserver fields in Namecheap or wherever you have registered your domain.
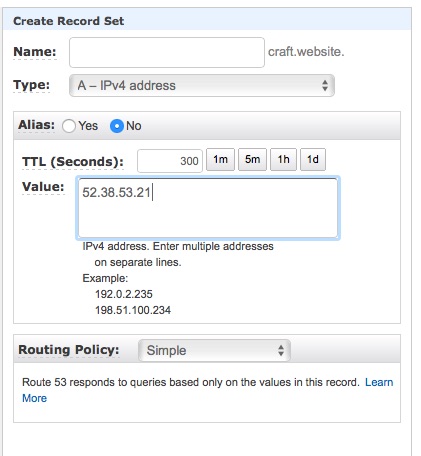
Now create an A record and a CNAME for your domain as record sets in this zone. Click the 'Create Record Set' button. Leave the 'name' part blank and put in the Public IP address for your instance as the value. You can find this IP address back in your EC2 manager for your instance.
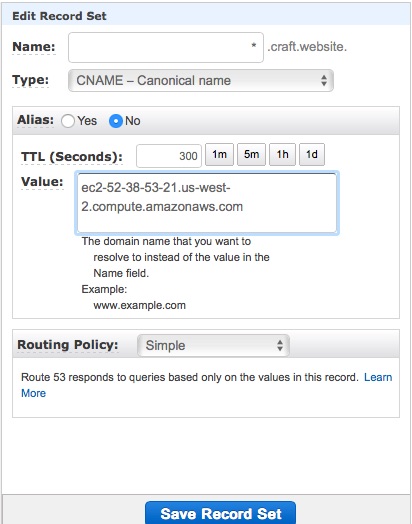
Do another record set for CNAME. Put a * in the name field and put the full EC2 URL in the value field.
Make sure you saved everything. And now just wait around for DNS to propagate.
You have registered a domain name, paid for it, set it's name servers to point to AWS. And inside AWS you have told it's Route 53 service what to do when traffic comes in there from your new domain. All that's left is for DNS to propagate around the world and galaxy and universe and various n dimensions.
Step 22 - Upload Craft and install it #
Download Craft over here.
So you have a domain name resolving to your EC2 instance. Now you can login to the server with your FTP client and upload Craft. For the FTP host use the ec2 URL. For the username use ec2-user. Leave the password blank since your Mac will check your SSH keychain and provide your key to AWS and let you in.
Load the contents of the 'public' directory into /var/www/html and load the 'craft' directory into /var/www.
AH HAH!!! You were rejected for improper permissions on the folders you're uploading to. The ec2-user does not have the right to upload there.
Step 23 - Set permissions #
To make the /var/www directory writable by ec2-user, do this in Terminal. Remember, you are still logged in to your EC2 instance via SSH.
$ chown -R ec2-user /var/www
You just told the server to change the owner of the /var/www directory to be ec2-user. And the '-R' meant make that change recursively so that ec2-user now also owns all of the subdirectories inside /var/www.
You should be able to upload Craft now. It'll take a while because I told you to set up a micro instance. Bandwidth is throttled a little.
Step 24 - Set Craft config permissions #
Craft will lose it's fricken mind if you do not have the right permissions set on a couple of important directories. So SSH back into your server if you got logged out somehow.
$ ssh ec2-user@ec2-52-ff-ff-ff.us-west-2.compute.amazonaws.com
Make Apache the owner of the Craft config directory. This will allow PHP processes to write to it, Craft requires this.
$ chown -R apache /var/www/craft/config
Same thing for the Craft storage directory.
$ chown -R apache /var/www/craft/storage
BOOM! You should be able to go to your ec2 URL or if it's propagated already, your new dumb dev domain. You can then hit the /admin URL to install Craft.
But wait! If you make one more change to Apache you will allow the .htaccess file that comes with Craft to run and you will be able to hide the index.php file from all urls on your site. Actually, doing this is important since Craft will install much more easily if you do.
Step 25 - Allow .htaccess in Apache. #
Open the httpd.conf file to alter your Apache configuration.
$ sudo nano /etc/httpd/conf/httpd.conf
Now search for this string 'var/www/html'. Keep searching until you find an opening Directory block like this:
<Directory "/var/www/html">
Inside that block look for this directive: AllowOverride None
Change that to: AllowOverride All
CONTROL + X out of there and confirm to save your changes.
Restart Apache to make that config change take effect.
$ sudo service httpd restart
Step 26 - Password Protect #
This is a dev site. Because it's a dev site I have not worried about helping you secure your server very carefully. And because this is a dev site, you very likely want to password protect the whole thing so that your clients' work in progress is not exposed prematurely.
I like this little HTTP Basic Auth password generator. Follow those instructions and upload the necessary files. Users will then need to enter a username and password for access.
Step 27 - Install Craft for Realz #
Seriously you should be ready now.
Make sure you open up the db.php file inside the /craft/config directory and set the DB values. Remember your database name is 'craft'. The username will be 'root'. The password will be whatever you set above. (Please tell me you didn't forget. But if you did...) The hostname will be 'localhost'.
Try installing Craft by going to your ec2 URL or domain url on the /admin directory. If you see this, keep calm and carry on.

Mitchell is the founder and CEO of Solspace, where he’s spent more than two decades helping businesses turn complex, underperforming websites into reliable growth engines. Equal parts problem-solver and big-picture thinker, he thrives on reducing friction and making the web work harder for marketing teams.